
Thermostat Not Working After Battery Change? Here's the Fix
- Update Date: July 2, 2026
Disclosure: This post contains affiliate links. If you purchase through them, we may earn a small commission at no extra cost to you.

Share the Glint Editorial Team
We're a small team of home appliance researchers and writers focused on HVAC and appliance troubleshooting across North America. Our guides are created by analyzing manufacturer manuals, HVAC service documentation, and real-world repair patterns reported by technicians and homeowners. We use multiple independent sources to validate key technical claims, including manufacturer documentation and industry safety guidelines (such as EPA and DOE references where applicable). Our goal is to turn complex technical information into clear, practical guidance for everyday homeowners.
Quick Answer: When a thermostat is not working after a battery change, the most common causes are reversed battery polarity, corroded contacts that need cleaning, a tripped HVAC breaker, or a wiring wire that came loose when you pulled the unit off the wall. In most cases you can fix it yourself in under 15 minutes with no tools. This guide covers every reason your thermostat stopped working — including why your AC thermostat not working for AC cooling specifically is sometimes a separate issue from the thermostat itself.
Is this your exact problem?
A thermostat not working right after a battery swap is genuinely one of the more frustrating situations — you did the right maintenance thing and now it's worse. Before you assume the worst, check which of these matches your situation. The fix is almost always something simple.
- The display is completely blank even with brand-new batteries installed — no lights, no numbers, nothing
- The display came on but the AC thermostat is not working — you set a temperature and the system never turns on
- The thermostat shows a low-battery warning icon immediately after installing fresh batteries
- The screen flickered on briefly then went dark again, or shows garbled characters
- The thermostat not working for AC specifically — heat works fine but cooling doesn't respond at all
- You can hear a click at the thermostat when you adjust the temperature but nothing happens at the air handler or outdoor unit
- Honeywell Thermostat Not Working After Battery Change
Any one of these after a battery change points to a fixable issue. Work through the steps below before calling anyone.
If you want to know: Honeywell Thermostat Not Working After Battery Change
-Honeywell publishes model-specific reset instructions rather than one universal procedure — their official support page lets you select your exact thermostat model and walks through the matching reset steps for that device. This matters because a reset combination that works on one Honeywell line often doesn't apply to another, so guessing at a button sequence can waste time or leave you thinking the unit is dead when it isn't.
-According to a Honeywell thermostat troubleshooting guide from Parts Town, a leading OEM parts distributor, a Honeywell thermostat failing to respond after a battery change is most often traced to dead batteries, batteries seated in the wrong position, or the wrong battery type for that model — all things worth rechecking even if you're confident you did it right the first time. The same guide notes that a tripped circuit breaker, the HVAC system being switched off, or an open furnace door can all mimic a "thermostat not working" symptom even when the thermostat itself is functioning normally.
-If you're not sure which reset method applies to your unit, look up your exact model — for example TH6210U2001 (T6 Pro), RTH111, or a FocusPRO™ series unit — since Honeywell's own troubleshooting documentation organizes reset steps by these specific model families rather than a single generic process. You can find your model number printed on the thermostat's back plate or in the battery compartment, then look it up on Honeywell Home's official reset tool or search it on ManualsLib for the full manual.
Why your thermostat stopped working after a battery change — ranked by likelihood
Most of these take two minutes to check and cost nothing. Start at #1 and work down — the majority of people find their fix in the first three cards.
Estimated share: ~35% of post-swap failures
Estimated share: ~25% of cases
Estimated share: ~20% of cases
Estimated share: ~10% of cases where display works but system won't run
Estimated share: ~7% of post-swap issues
Estimated share: ~3% of cases
How to fix a thermostat not working after a battery change
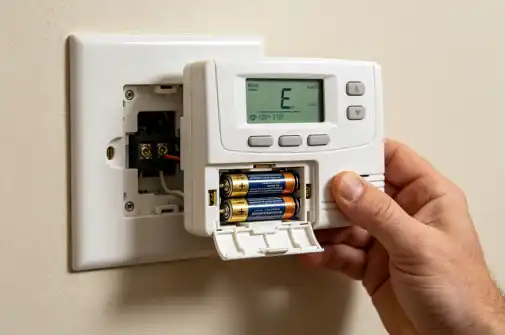
- 1Recheck battery polarity — seriously, do this firstPull the batteries out and look carefully at the + and − symbols molded into the plastic of the battery compartment. Reinsert the batteries one at a time, deliberately matching each cell's positive end to the + marking. It sounds obvious, but reversed polarity is the single most common reason a thermostat is not working after a battery change — and it's embarrassingly easy to do in a dark hallway. Put the batteries back in, replace the cover, and check the display. If it lights up, you're done.
- 2Clean corroded battery contactsIf the old batteries left any white powder or blue-green crust behind, dip a cotton swab in isopropyl alcohol (70% or higher) and scrub the metal contact springs gently until the residue lifts. Let it dry fully — two minutes is enough. Corrosion creates resistance that makes even fresh alkalines read as dead, so this step matters more than it looks. If the contacts are deeply pitted or the spring has lost tension, cleaning won't fix it — the thermostat needs replacing.
- 3Confirm you're using the right battery typeCheck your thermostat's manual on ManualsLib (search your model number) or look at the label inside the battery door — most specify "alkaline only." Swap in name-brand alkaline batteries (Duracell or Energizer) if you previously used rechargeable NiMH cells or bargain-brand batteries from a bulk pack. NiMH cells run at 1.2V instead of 1.5V, which confuses many thermostats into thinking the battery is low or dead before it's even started.
- 4Try a manual resetWith fresh batteries installed, check your model's manual for the reset procedure. On many Honeywell programmable models, you hold the fan and up-arrow buttons simultaneously for 5 seconds. Some models have a small recessed reset button accessible with a pin. Others reset by removing batteries, pressing any button (to discharge the capacitor), waiting 30 seconds, then reinserting. A reset clears any fault state the firmware entered during the power interruption. This alone fixes the issue on roughly 1 in 20 post-swap failures.
- 5Check the HVAC breaker and furnace door switchIf the thermostat display is on and responding but the AC thermostat is not working — meaning you adjust the temperature and nothing happens — go to your electrical panel and look for a tripped breaker labeled "AC," "furnace," or "air handler." A tripped breaker sits between ON and OFF; push it fully to OFF then back to ON. Also check that all access panels on the furnace and air handler are fully closed and latched — a door interlock switch will cut power to the whole system if a panel is even slightly ajar.
- 6Inspect and re-seat thermostat wiring at the wall platePull the thermostat body off the wall plate again. Look at the terminal block — each wire should be firmly clamped in its labeled terminal (R, C, Y, W, G are the most common). If any wire looks loose, has slipped out, or has a frayed tip with less than ¼ inch of bare copper showing, use a small screwdriver to loosen the terminal screw, trim the wire tip with scissors if needed, and re-secure it. Pay special attention to the R wire (24V power feed) and the Y wire (AC cooling signal) — a loose Y wire is the most common reason the thermostat not working for AC specifically happens even when heat still works fine.
- 7Still nothing? Here's when to call a proCall an HVAC technician if you've completed all six steps and: the display is still blank with confirmed good batteries and clean contacts, the system still won't run even with all wiring confirmed secure and the breaker reset, or you're seeing error codes on the display that you can't clear. At this point the problem is likely either a failed thermostat (the internal circuit board died), a failed HVAC control board, or a blown low-voltage fuse inside the air handler — none of which are safe or practical to diagnose without HVAC training.
DIY fixes vs. pro repair vs. replacement — what this costs you
Most thermostat-not-working-after-battery-change situations cost nothing to fix. The escalation path is short but the price jumps fast — here's where each scenario lands.
| Fix | DIY Cost | Pro Cost (parts + labor) | DIY Difficulty | Verdict |
|---|---|---|---|---|
| Reinsert batteries correctly / reset polarity | $0 | $75–$150 (service call) | ✅ Very Easy | DIY — always try this first |
| Clean corroded battery contacts | $0–$3 (isopropyl alcohol) | $75–$150 | ✅ Easy | DIY |
| Replace with correct alkaline batteries | $4–$10 | $30–$60 during a service visit | ✅ Very Easy | DIY |
| Re-seat loose thermostat wiring at terminal block | $0 | $75–$150 | ✅ Easy (low-voltage wiring) | DIY if comfortable with small screwdriver work |
| Reset tripped HVAC breaker or close furnace door | $0 | $75–$150 service call if you miss this | ✅ Very Easy | DIY — check this before calling anyone |
| Replace thermostat (basic programmable) | $20–$60 (unit only, e.g. Honeywell T6 Pro) | $120–$280 installed | ⚠️ Moderate — involves wiring terminals | DIY if you're comfortable with the wiring step above; otherwise hire a pro |
| Replace thermostat (smart — Nest, Ecobee) | $130–$250 (unit only) | $230–$400 installed | ⚠️ Moderate | DIY friendly with C-wire check; hire a pro if C-wire needs adding |
| HVAC control board replacement (if board failed) | $80–$250 (board part only) | $400–$900 installed | 🔴 Requires HVAC knowledge | Pro only — wrong board or incorrect install can damage the system |
| ⚠ When to stop DIYing | Stop and call an HVAC technician if: the display stays blank after verifying polarity, cleaning contacts, and using confirmed good alkaline batteries; the system won't run after re-seating all wiring and resetting the breaker; or you see burn marks or smell burning near the thermostat or air handler wiring. These are equipment failures that need professional diagnosis. | |||
📈 Repair vs. Replace — Should You Fix or Upgrade Your Thermostat?
A basic programmable thermostat runs $20–$60; a smart thermostat (Nest, Ecobee) runs $130–$250. Here's the decision framework:
| Battery fix, contact clean, or wiring re-seat Cost: $0–$10 | Any thermostat age | ✅ Always try DIY first — takes 10 minutes |
| Replace basic thermostat (hardware fault confirmed) Cost: $20–$60 | Unit age 7+ yrs or post-battery-damage | ✅ Replace it — cheaper than any service call |
| Upgrade to smart thermostat Cost: $130–$250 | Any situation | ⚠️ Worth considering — Energy Star smart thermostats save ~8% annually on heating and cooling bills |
| Pro diagnostic + HVAC control board replacement Cost: $400–$900 | Old system, repeated failures | ❌ Evaluate system age — if HVAC is 12+ years old, full system replacement may be smarter |
Energy Star certified smart thermostats can reduce annual heating and cooling costs by approximately 8%. See: energystar.gov — Smart Thermostats
Sources & References
- 🔗 Honeywell Home / Resideo — Thermostat Battery Guidance (polarity, battery type requirements, and reset procedures)
- 🔗 Google Nest Support — Nest Thermostat Battery and Charging Issues (C-wire and power diagnosis)
- 🔗 U.S. Department of Energy — Thermostats (wiring, installation, and one-mode failure guidance)
- 🔗 RepairClinic — Thermostat Repair Help (corroded contacts, control board failure diagnosis)
- 🔗 ManualsLib — Honeywell Thermostat Manuals (battery type lookup and reset procedures by model)
- 🔗 Energy Star — Smart Thermostats (8% annual savings data and certified model list)
Q1: Why is my thermostat not working after I changed the batteries?
The most common reasons are reversed battery polarity, corroded battery contacts, a loose wire that got pulled during removal, or a tripped HVAC breaker. In about 80% of cases, reinserting batteries correctly and cleaning the contacts with isopropyl alcohol fixes the issue in under 10 minutes at no cost.
Q2: Why is my thermostat display blank after changing batteries?
A blank display after a battery change almost always means the batteries were inserted backwards (wrong polarity), the contacts are corroded, or the wrong battery type was used. Pull the batteries out, check the + and − orientation against the markings in the compartment, clean any corrosion with isopropyl alcohol, and reinsert. Use name-brand alkaline batteries only — rechargeable NiMH cells run at lower voltage and many thermostats interpret them as dead.
Q3: My thermostat display is on but the AC won't turn on — what's wrong?
When the thermostat display works but the AC won't respond, the issue is usually not the thermostat itself. Check your electrical panel for a tripped AC or condenser breaker, confirm the Y wire (cooling signal wire) is securely seated in its terminal on the thermostat wall plate, and verify the air handler access panel is fully closed. A door interlock switch on the furnace or air handler will cut power to the system if any panel is slightly ajar.
Q4: How do I reset my thermostat after changing the batteries?
Reset procedures vary by brand and model. On most Honeywell programmable models, hold the Fan and Up Arrow buttons simultaneously for 5 seconds. Some models have a recessed reset button accessible with a pin or paperclip. For a universal soft reset on most brands: remove batteries, press any button once to discharge the capacitor, wait 30 seconds, then reinstall batteries. Always check your specific model manual on ManualsLib for the exact reset procedure.
Q5: Can wrong batteries cause a thermostat to stop working?
Yes. Most thermostats require standard alkaline batteries (1.5V per cell). Rechargeable NiMH batteries output approximately 1.2V per cell — roughly 20% less voltage — which many thermostats read as a low or dead battery, causing them to refuse normal operation or show a constant low-battery warning. Always use name-brand alkaline batteries such as Duracell or Energizer, and confirm the battery type specified on the label inside your thermostat's battery door.
Q6: Why does my thermostat keep showing low battery even with new batteries?
A persistent low-battery warning with fresh batteries usually means one of three things: the batteries are rechargeable NiMH (too low voltage), the battery contacts are corroded and creating resistance that mimics a low charge, or the thermostat's firmware is stuck in a fault state and needs a manual reset. Clean the contacts with isopropyl alcohol, confirm you are using alkaline batteries, and then perform a manual reset following your model's procedure.
Q7: What does it mean when thermostat wiring comes loose?
Thermostat wires are thin 18-gauge low-voltage wires that connect to labeled terminals on the wall plate behind the thermostat body. When you pull the thermostat off the wall, it is easy to accidentally tug one loose. A loose R wire (the 24V power feed) will cause the display to go blank or flicker. A loose Y wire (the cooling signal) will cause the AC to stop responding while heat still works. Reinspect all terminal connections and firmly re-seat any wire that is not fully clamped.
Q8: How do I clean corroded thermostat battery contacts?
Dip a cotton swab in 70% or higher isopropyl alcohol and gently scrub the metal contact springs inside the battery compartment until the white powder or blue-green residue is gone. Let the contacts dry for 2 minutes before inserting new batteries. If the metal spring contact is deeply pitted, has lost its tension, or the corrosion has spread into the circuit board area, the thermostat should be replaced rather than cleaned.
Q9: My heat works but my AC thermostat is not working — is the thermostat broken?
Probably not. A thermostat that controls heat normally but not AC is almost always a wiring or equipment issue rather than a failed thermostat. Check the Y terminal wire connection at the thermostat wall plate, verify the outdoor AC condenser breaker has not tripped, and confirm the air handler fuse is intact. The U.S. Department of Energy notes that single-mode HVAC failures (one function works, the other does not) are most commonly caused by wiring problems, not thermostat failure.
Q10: How do I know if my thermostat is broken or if the HVAC is the problem?
A quick two-mode test: set the thermostat to heat mode and raise the set temperature 5°F above room temperature. If heat comes on, the thermostat is functioning — the AC issue is equipment-side. Then switch to cool mode and lower the temperature 5°F below room temperature. If neither mode triggers the system, the thermostat or its wiring is likely the problem. If one mode works and the other does not, the thermostat is probably fine and the issue is in the equipment or wiring for the non-working mode.
Q11: Should I replace my thermostat or repair it?
If the issue is batteries, polarity, or corroded contacts, repair it yourself — it costs nothing. If the thermostat needs replacement due to a confirmed hardware failure, basic programmable thermostats cost $20–$60 and are straightforward to install yourself using the wiring photo method. Any repair or service call that would cost more than $60–$80 for a thermostat issue makes replacement the smarter financial decision, since a new unit is cheaper than most diagnostic service visits.
Q12: Is it safe to work on thermostat wiring myself?
Yes, with one important boundary. Thermostat wiring operates at 24V low voltage, which is safe to handle and inspect with the system running. You can safely re-seat wires at the thermostat terminal block without turning off any breakers. However, the wiring inside the air handler itself carries 120V or 240V line voltage and is genuinely dangerous. Never open the air handler cabinet or touch any large wires inside it without first turning off the HVAC breaker at your electrical panel.
Q13: How much does it cost to fix a thermostat not working after battery change?
In most cases, the fix costs nothing — reversed polarity and loose wires require no parts. Cleaning corroded contacts costs $0–$3 for isopropyl alcohol. Replacing the batteries with correct alkaline cells costs $4–$10. If the thermostat itself has failed and needs replacing, a basic programmable unit costs $20–$60 for the part. A professional HVAC service call for thermostat diagnosis typically runs $75–$150, which is why exhausting all DIY steps first saves significant money.
Q14: What are the terminals on a thermostat and what do they do?
The most common thermostat terminals are: R (24V power from the transformer), C (common wire, completes the circuit — required for smart thermostats), Y (cooling signal to the AC), W (heating signal to the furnace), G (fan signal), and sometimes Y2 and W2 for two-stage systems. The R and C wires handle power. The Y wire is the most commonly displaced wire causing AC-only failures after a battery change. Taking a photo of your wiring before disconnecting anything is the single best practice for thermostat work.
Q15: Why does my Honeywell thermostat not work after battery change?
Honeywell RTH and T-series thermostats are particularly sensitive to battery type. Honeywell Home documentation explicitly specifies alkaline batteries only for most models — rechargeable NiMH batteries will cause persistent low-battery warnings or operational failures. Additionally, many Honeywell programmable models enter a locked state after a power interruption; the standard reset is holding the Fan and Up Arrow buttons for 5 seconds. Confirm battery type, perform the reset, and re-inspect wiring at the R terminal if the display is on but the system will not respond.
Q16: Why does my Nest thermostat not work after battery change?
Nest thermostats primarily charge an internal battery from the C wire (common wire) rather than from replaceable batteries. If your Nest is unresponsive after a battery swap, the more likely issue is a C-wire problem rather than the batteries themselves. According to Google Nest Support, the Nest Learning Thermostat and Nest Thermostat E require a C wire for stable operation — without it, the device drains its internal battery faster than it can recharge. Check the C terminal connection at the wall plate and verify your HVAC system has a C wire.
Q17: How often should I change thermostat batteries?
Most thermostats should have batteries replaced annually, typically in the fall before heating season begins. The thermostat will usually display a low-battery warning 1–2 months before the batteries are fully depleted. Using name-brand alkaline batteries (Duracell or Energizer) rather than generic or bulk-pack batteries extends battery life and reduces the likelihood of battery leaks that corrode the contacts.
Q18: What should I do if my thermostat is blank and won't turn on at all?
Work through these steps in order: (1) Re-insert batteries with confirmed correct polarity. (2) Replace with fresh name-brand alkaline batteries. (3) Clean battery contacts with isopropyl alcohol if corrosion is present. (4) Perform a manual reset per your model's manual. (5) Re-inspect all wiring at the wall plate terminal block, especially the R wire. (6) Check the HVAC breaker. If the display remains blank after all six steps, the thermostat's internal circuit board has likely failed and the unit should be replaced.
Q19: Can a tripped breaker cause my thermostat to stop working?
Yes, in a specific way. If your thermostat runs on batteries, the display may still illuminate (powered by batteries) even when the HVAC breaker is tripped — but the system will not respond to thermostat commands because the equipment has no power. The thermostat will appear to work normally, showing temperature and responding to button presses, but the furnace or AC will simply not turn on. Check the breaker panel for any tripped breaker labeled AC, Furnace, Air Handler, or HVAC before assuming the thermostat is faulty.
Q20: What is a C wire and do I need it for my thermostat?
The C wire (common wire) is the return path for the 24V circuit that powers your thermostat. Traditional battery-powered thermostats do not require a C wire. Smart thermostats including Nest, Ecobee, and most WiFi-enabled models require a C wire for continuous power to maintain WiFi connectivity and prevent battery drain. If you are upgrading from a basic thermostat to a smart thermostat and your system does not have a C wire, you will need either a C-wire adapter kit (often included with the thermostat) or a professional to run a new wire.
Q21: How do I know if my thermostat needs to be replaced?
Replace the thermostat if: the display remains blank after confirming correct polarity, clean contacts, and good alkaline batteries; the system does not respond after re-seating all wiring and resetting the breaker; the display shows error codes that cannot be cleared; or the unit is more than 10–15 years old and showing intermittent failures. A replacement basic programmable thermostat costs $20–$60 — less than a single HVAC diagnostic service call — making early replacement a sensible decision when multiple DIY steps have failed.
Q22: Is it better to hire an HVAC technician or replace the thermostat myself?
For battery and contact issues, always DIY first — the fix is free and takes under 10 minutes. For thermostat replacement itself, a basic programmable thermostat is a straightforward DIY project if you photograph the wiring before disconnecting it and are comfortable using a small screwdriver. A smart thermostat installation is also DIY-friendly unless a C wire needs to be added, which requires running new low-voltage wire and is best left to a professional. Call a technician only if you have confirmed the thermostat is working but the system still will not respond — that indicates an equipment problem, not a thermostat problem.
Q23: Can I use rechargeable batteries in my thermostat?
Generally no, and most thermostat manufacturers explicitly advise against it. Rechargeable NiMH batteries produce approximately 1.2V per cell compared to 1.5V for standard alkaline batteries. Most thermostat circuits are designed around the 1.5V standard, and the 20% lower voltage from NiMH cells causes many models to display continuous low-battery warnings, fail to trigger the system relay, or shut down entirely. Always use the battery type specified on the label inside your thermostat's battery compartment — in most cases that means alkaline only.
Q24: What is the furnace door switch and why does it affect the thermostat?
Most furnaces and air handlers have a door interlock switch — a small safety device that cuts all power to the HVAC system when the access panel is opened or not fully latched. This prevents the system from operating with exposed components. If the access panel on your furnace or air handler was disturbed during the thermostat battery change (for example, if you were investigating wiring), and is not fully re-latched, the interlock switch will prevent the system from running even though the thermostat appears fully functional. Push all access panels firmly until they click or latch securely.
Q25: How long does a thermostat last and when should I upgrade?
A well-maintained thermostat typically lasts 10–15 years. Consider upgrading when the unit is experiencing recurring issues after more than 10 years of use, when repair costs approach the price of a new unit, or when you want to take advantage of energy savings. According to Energy Star, certified smart thermostats save homeowners an average of approximately 8% annually on heating and cooling costs. At current energy prices in the US and Canada, a smart thermostat typically pays for itself within 1–2 years through energy savings alone.
Q26: Why is my Honeywell thermostat not responding after I changed the batteries?
The most common causes are dead or incorrectly positioned batteries, the wrong battery type for your model, a tripped circuit breaker, or the HVAC system being switched off — check these before assuming the thermostat itself has failed. If everything checks out, a model-specific reset (see below) usually resolves it.
Q27: How do I reset my Honeywell thermostat after a battery change?
Honeywell's reset procedure differs by model, so the fastest way to find the correct steps is to select your exact device on Honeywell's official reset support page, which walks through the matching process for your unit. If you don't know your model number, it's printed on the back plate or inside the battery compartment.
Table of Contents
Toggle